Pages

Showing posts with label Science. Show all posts

Tuesday, June 9, 2020

Neutralisation

Aim - To observe a neutralisation reaction

Equipment
- Test Tube
- Test Tube Rack
- Hydrochloric acid
- Sodium Hydroxide
- Dropper
- Universal Indicator

Method -
- Add approximately 1-2 ml of Sodium Hydroxide and place the test tube into the test tube rack. Add 3-5 drops of universal indicator
-  Using a dropper bottle, add Hydrochloric acid drop by drop. Be extra careful because adding even a small amount of extra acid can mean you'll miss the neutralisation point.

Results -
After adding the hydrochloric acid we noticed that the solution had immediately turned green and after we mixed it in it had turned yellow. We then added a few more drops of sodium hydroxide which turned the solution dark blue. Afterwards, we added more hydrochloric acid and finally made green, which meant that the solution had become neutralised.


pH SCALE AS AN INDICATOR - ACIDS AND BASES


Discussion -
When we added the universal indicator we realised that we needed to put in more solution as the colour was very translucent. As we added in the hydrochloric acid we noticed the solution had changed drastically, instead of being a dark blue it had turned a warm yellow which was surprising. We then played with it a bit more until we finally found the neutralisation point which was lime green. We weren't that happy with that colour so we played with it a bit more until we were happy with the colour. it was a slightly darker green but we liked it more than the green we had before.

Conclusion -
The experiment was a success as we had figured out how to create a neutralised solution which had equal parts of acids and base. This was a fun experiment as we could play with the solution however we wanted and see the different colours it could become. It was a fun experiment and I would do it again.

Monday, November 18, 2019

Constellations

In science we were given the task to create a star map of four constellations that were close together. I chose to make Aquarius, Capricornus, Microscopium and Pisces Austrinus. I chose Aquarius because it is my zodiac sign, I also chose the others because it was close to aquarius. The first thing I did was cut out a cardboard and black piece of paper in the shape of a circle. then i mapped out my constellations with pins and string and secured it with pva glue and let it dry. We then took out the pins, named the stars and one sun. The difference of astronomy and astrology is that astrology is theories that aren't always backed up with evidence. Astronomy is the actual study of space science. people have used star maps as a way of navigation / travel. people who have done this are polynesians. Polynesians have used the southern cross, a constellation to find out where they needed to go.

Here is a photo of my star map


Friday, September 27, 2019

Microscopes

This week for science we learnt about microscopes. The first thing we did was go to the park to collect some plant and animal samples. It was a fun experience because we got to go out and collect things we found interesting. I didn't collect any living specimens because they would always run away. I decided just to grab some plant samples like grass and leaves to inspect. After that we couldn't use live specimens so we had to use methanol to kill them quickly.

On Thursday we decided to see our specimens under two different microscopes. One was called the dissection microscope. This meant that we could see the "living animals" but it didn't need light to be able to be seen. The other one is called the monocular microscope. this is used for plants like leaves and onions peels but you need sunlight to be able to see it. For the plants, we had to create a slide. A slide is two pieces of thin glass squishing a specimen with iodine to make it easier to see. I looked at a onion peel slice, and a Japanese red sponge. They looked really cool underneath the microscope because you can see it even closer and can also see the cells, here are some photos of them both.    

Thursday, September 5, 2019

My Unique Organism - Cozaryious

For Science we were asked to create a unique organism that never existed. We were asked to name it, give a description of the habitat, Abiotic (Non living things) and Biotic (Living things) factors. I decided to name mine Cozaryious or Janiel Reavey. It lives in a waterfall beachey area on Earth. It slides around to find food and liquid to survive. It eats Water and Drinks Bananas. The abiotic factors are water sand, light from the sun, Rocks, and grass. The Biotic factors are Snails, Otters, Banana Trees, Trees, and the other Cozaryious. Here is a photo of Cozaryious.


Thursday, July 4, 2019

Sherbert

For the last week of term we were able to create homemade sherbert. It was a long awaited experiment from our class, so Mr finally agreed to let us.


Ingredients:Baking soda, Icing Sugar, Citric Acid, Tartaric Acid, Raro ( To taste). 

Method:

1.Add 1 teaspoon amounts of citric acid and tartaric acid.

2. add two teaspoons of baking soda and icing sugar. 

3. add as much raro as you desire and taste, add more ingredients if needed to perfect taste

Results
The sherbert tasted really good, even though I needed to add a little more icing sugar to the mixture to make it perfect. It was really fun to make, but a big mess with a lot of people.

Thursday, June 27, 2019

Simple Sugars

This week for Science, we have been working on food and digestion. Our first experiment was about how to figure out if something has simple sugar inside of it. The test is called Benedict's Test

Aim: To Test a sample of food to determine whether it contains simple sugars
Equipment: Bunsen Burner, Test tube tongs, Benedict's Solution, A sample of food.

Method:
1. Place about 2 mL of the sample into a test tube and then add 5 drops of benedict's Solution.

2. Heat with a bunsen burner until it changes colour, do not boil.

Conclusion: The colour of the liquid changed from blue to an orangy red hue. The sample we used was an apple.

Friday, June 7, 2019

Dissecting A Cow's Eye

Aim: To see the different parts of the eye and to understand what each part is.

Equipment: Cow Eye, Scalpel, Tweezers, Scissors, A Tray, Newspaper, Gloves

Method:

1. set up your newspaper and tray so then the surface you are working on is covered if anything spills. Make sure to wear gloves so then nothing goes on your hands

2. cut the fat and muscle off the eye until you can see the cornea, which is a huge black circle that is protruding from the eye.

3. carefully cut the cornea with the scalpel and face it away from you. black and clear liquid will ooze out so don't aim it at you.

4. after all the liquid is out cut the eye in half so there is a back and a front. 

5. from there you can see the different parts of the eye, you can pull out the lens, which is a clear hard part which focuses light into your eye. You can see the Retina which is a metallic blue coloured part of your eye. 

Results
The experiment was a little gross because it was very graphic but it was cool to see the different parts of the eye. I learnt that the eye is a pretty complicated part of your body.

Would you every do this?

Friday, May 31, 2019

Telephone Cups

This term we have been learning about energy. One of our experiments were about cup telephones. The first thing we did was cut some string and tie the ends so then it would fit in the cup. Then we were given a cup to colour in with ink markers. I decided to make mine a gradient with purple and blue. I then added black dots in the middle and then connected my cup with Ashanti's. We tried out the telephone cups and they worked, we just had to pull the string. 

Aim: To make a Cup Telephone

Equipment:
Styrofoam Cup
String
Colouring pens

Method:
1. Cut a long piece of string and tie the ends in a double knot.
2. Cut a little hole in the bottom of the styrofoam cup and put the string inside. 
3. Decorate the cup
4. pull the string so then it is tight 
5. You can try it out.

It was a really fun experiment to do because it was fun to see what we could say to each other. 

Thursday, May 9, 2019

Science - Dry Ice

This week for science we worked with dry ice to see what sublimation is. Sublimation is when a solid goes straight to a gas without going into a liquid. I would love to do this again because it was cool seeing it bubble even though it is ice.

Equipment:
Beaker
Tongs
Dry Ice
Warm Water

Method:
1. Fill your beaker with warm water, fill it up to around 50mL
2.Put the dry ice in the water with tongs
3. See what happens

It was a really fun experiment because I've never used dry ice, I've seen some experiments where they do different things with it but this was still cool. It was weird seeing vapour come out of water that was cooling down very quickly but it was still cool.

(Not my photo but how it looked like)

Tuesday, April 30, 2019

Conduction

This week for science we are learning about Conduction and Heat. We did an experiment that involved a ball and hoop. We heated up the hoop because it couldn't fit inside, after a few minutes we put the hoop onto the ball and watched it go through.Conduction is when an object has been in contact directly with heat. One of the ways conduction is shown is when you heat up a pot of water on a stove. The heat from the stove is going under the pot which is spreading it around the metal pot, the water then heats up because of the heat being spread around the pot and then it starts boiling because of the heat.


Thursday, April 11, 2019

Science

For science we are able to choose what experiments we could be able to do. I chose to do a cool experiment that includes heat and water. The experiment is called a underwater candle experiment. I saw this experiment before and I thought it was cool so I decided to choose this as my chosen experiment.

Materials
Candle
Glass Cup
Lighter
Plate with higher rim
Water

Hypothesis: I think that the water rises because of the heat and pressure that the candle creates, when the candle burns out I think the pressure is released as it gets colder and the water rises because of the loss of pressure.

Method:

Put water inside the plate just before hitting above the rim.

Place a candle in the center of the water filled plate.

Light the candle

Place the cup around the candle

Wait for the candle to burn out and watch what happens

Here is a video of the experiment
https://www.youtube.com/watch?v=hd7vbYzodoo

Thursday, March 21, 2019

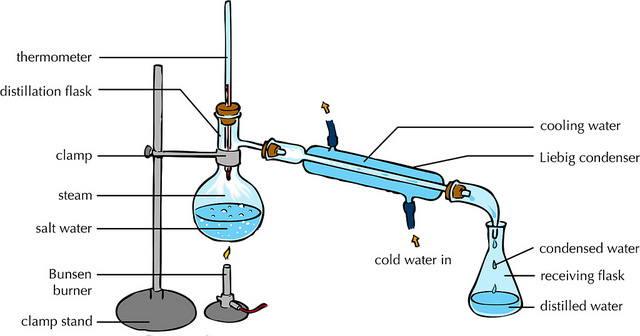
Distillation

This week for science we have been working about distillation, one of our experiments was distilling water from coke. It was a really fun experiment because at points it was distilling very quickly. Here is how we did our experiment.

Aim: To separate water from coke using distillation.

Equipment:Coke, conical flask, heatproof mat, a delivery tube and bung that fits the flask, bunsen burner, tripod, gauze mat, retort stand, boss head and clamp, boiling tube, Beaker

Method: 

1. Set up your equipment so then it looks like this Image result for distillation

2. add about 50mL of coke to the conical flask and then put the bung and delivery tub on top of the conical flask.

3. Light your bunsen burner and put it under the tripod that holds the conical flask .

4. Heat the coke until it is at boiling point and carry on so then you can get the water out and into the boiling tube that is connected to the delivery tube that  goes into a beaker with ice inside of it. The ice will condensate the water vapor so then you have water.

5. Once most of the water is evaporated turn of the bunsen burner and look at your results.

Results:
Our experiment went very well and we collected quite a lot of water, it was fun watching the water condensate and then drop into the boiling tube. When the coke was at boiling point the water was boiling off quickly. The ice was condensating the water in the delivery tube which was cool to look at, it solidified very quickly and came in little drops. It separates the liquids by evaporating the water and making it go through the delivery tube. Distillation could be used in many ways in real life like turning saltwater into fresh drinking water, Gasoline is distilled from crude oil and so much more. During the experiment two different things are happening, Evaporation and Condensation. when the water is being boiled off it is evaporating into water vapor and going through the tube, condensation then happens after the water goes through the delivery tube which cools it down and turns it back into water.

Would you ever try to do this experiment?

Friday, March 15, 2019

Crystals

This week for our science experiment we created sugar crystals. It was really fun to make them, especially when we do get to eat them and see how well we made our mixtures.

Aim: To create sugar crystals


Equipment: Beaker, Sugar, Water, bunsen burner, food dye, cup, popsicle stick, measuring cylinder, something to stir with, tripod, heat mat, gauze mat, lighter.


Method:


1. Wash equipment


2. Add 50 mL of water into the beaker using the measuring cylinder.


3. Set up your bunsen burner and set it up. put the beaker on the tripod and on the bunsen burner. 


4. heat up the water to boiling point, then turn off the water so then you can add the sugar.


5 Gradually add sugar and stir it until it dissolves, then add more and repeat until you have a clearish liquid. 


6. grab a popsicle stick and dip it in water, then dip it into sugar so then as the crystal is growing it has something to stick too.


7. Grab a cup and put the popsicle inside of it, this is where the crystal will grow.


8. Add food colouring if you want and then pour in the liquid into the cup. Place it near a window to dry and grow.


9. wait a week or more then check how much your crystal has grown.


Results: The mixture looked really good even though we have only left it for a day, it is crystallising very well and it also looks very good. 

Conclusion: The mixture was very saturated, Saturated means when there is a lot of water in a mixture or item to the point that it can no longer absorb any more. We need our mixture to be saturated because when the water has started to evaporate the sugar will crystallize over time, we can't rush the mixture because it won't actually crystallize as well. The crystal grew very well and ended up looking cool as well.

Here is a photo of the mixture before and after.
BEFORE

 AFTER
What do you think I could've done better

Tuesday, March 5, 2019

Science

This week for science we did a experiment about dilution. Dilution is when a liquid has been made thinner by using water or a solvent. Here is how we did the experiment 

Equipment:
Potassium Permanganate crystal, Six large test tubes, tweezers, a plastic pipette, a test tube rack, 10mL measuring cylinder

Method:

1. Place six test tubes in the test tube rack. 

2. Using the measuring cylinder fill one test tube with 10mL of water, fill the rest up to 5mL of water. 

3.Using your tweezers put the single little piece of the crystal inside the 10mL test tube. 

4. Shake the test tube until the crystal dissolves and it is very concentrated. When something is very concentrated the mixture contains a lot of solute.

5. Using the pipette take out 5mL of water from test tube 1 and transfer it into the second one.

6. gently shake the second test tube and repeat the transfer process till all the test tubes are filled. 

I hope you try out this experiment because it is really cool, have you ever tried to do this experiment?

Friday, February 15, 2019

Hyrdogen Gas

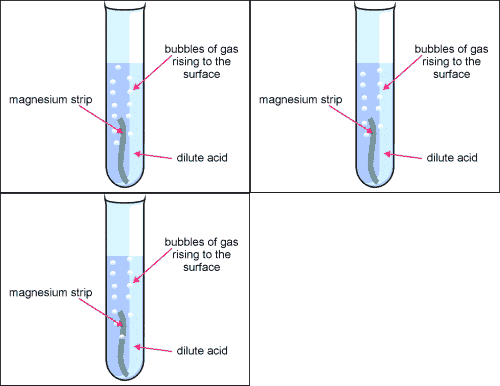
Aim: To show that hydrogen gas is produced when a metal reacts with acid.

Equipment: A test tube, A boiling tube, A heating pad, Bunsen burner, Wooden splint, A bottle of acid, A piece of metal, Safety glasses

Hypothesis: I think that when the acid and metal react with each other I will expect to see bubbles erupting and when I put a match stick it will create popping noises.

Image result for Metal + acid

Method:

1. Wear Safety glasses so nothing gets into your eyes and light the Bunsen Burner.

2. Be cautious and put the acid inside of the test tube, you only need 2mL. 

3. grab your sample of metal  and put it into your test tube containing and acid.

4. Grab the two test tubes and hold them  together for a few minutes, allowing time for the inverted boiling tube to fill with gas from the acid and metal reacting with each other.

5. When you think the tube is full, you or your lab partner should light a wooden splint.

6. Carefully, but quickly, tilt the boiling tube full of gas upwards and insert the burning splint into the mouth of the test tube. Make sure you don't burn yourselves or spill the acid and metal.

Observations: The first few times we tried it didn't work until we were told to put our finger on top of the tube with the acid and metal and then put the splint in. when we did the experiment the popping noises always changed on how loud it was.

Discussion: This was because the Hydrogen gas combusted.

Conclusion: My hypothesis was was correct, the gas did pop when the splint and the hydrogen gas were close together

Wednesday, June 20, 2018

Scientific Investigation

Today for science we made a scientific Investigation about candy and guessing.

The question was: Can I tell the flavour of a candy piece if I can't see it.

My prediction was: I will be able to get at least one guess right with guessing.

The materials I used were:  Candy pieces, A person, A piece of paper to put answers in, a blindfold.

Method:

1. Grab materials

2. Make a table on the piece of paper, write the guess, if you got it right or wrong, Taste, notes, and after you guess the colour and name of the flavour. 

3. Close your eyes and grab a piece of candy, take a first guess and keep your eyes closed.

4. Take a bite and take a final guess of the flavour. 

5. See if you got it right and right it down, carry on until you finish eating.

6. Write a conclusion

My conclusion: I found out that I had only gotten one wrong which is an achievement. It is just a game of luck and guess, you never know what it could be until you take a bite.

Thursday, March 15, 2018

Forensic Science

This term for science we have been learning about Forensic science.
Forensic science is the science used by the police and detectives all
around the world to help solve a crime.


We learnt about Locard's Exchange Principle, Fingerprints, fibres,
using Microscopes Making Hands with Cement and chromatography.


My favourite Part was making the cement hands, Mine broke but it
was still fun to make the cement. I worked with Aiden and Ruby.
I really liked it because you could actually see everything forming.
When you mixed the Plaster Of Paris and water together it forms the
cement in seconds. As I was making the cement Ruby poured in a
little too much water and it became very gooey and it didn’t form.
Mrs wheeler then put someone else's cement in ours and it formed the
right cement. I found it really fun even though mine broke afterwards,
I would do it again.

We were also asked to see what fingerprints we had. I have all loops
and no Arches or Whorls.

Monday, August 14, 2017

The scientific Method

Aim: To compare the boiling point of tap water and salt water.

Hypothesis: I think that the boiling salt water is higher than tap water.

Equipment: 
150mls Tap water (two)
Salt (2tbs)
Safety glasses
2 beakers
Bunsen burner
Bunsen burner tripod
Heat resistant mat
Gauze mat
Thermometer

Method:
1. Collect your equipment.
2. Attach the bunsen burner to a gas tap.
3. fill up both beakers with water.
4. add salt to one beaker and mix
5. Place the beaker with tap water on the tripod.
6. Place the bunsen burner on the heat mat underneath.
7. Light the bunsen burner and adjust the flame to blue.
8. As it heats up place the thermometer in the beaker of water until it is boiling.
9. Record the temperature on your blog.
10.Repeat the process with the salt water 

Findings: Boiling Point

Tap water: 102c

Salt water: Centigrade.

Monday, August 7, 2017

Science

Hands on fire

Aim: I want to Safely be able to set myself on Fire.

Hypothesis: I think the hypothesis is that when your hands are lit on fire it will burn and start to sting.

Equipment:1.Water
2.Soap (Detergent)
3.Lighter
4.Safety Glasses
5.Lab Coat

Method
1.Be SAFE.
2.Wet your hands, Wrists and forearms.
3.Grab a scoop of bubbles.
4.Hold the bubbles in front of your face, as far away from you as you can. Lock your elbows.


5. To get rid of the fire, SLOWLY move your hands apart.

6. DO NOT DROP YOUR HANDS BELOW YOUR EYE LEVEL because the fire goes up and you will set yourself on fire.

Results:
The results are that when you set someones hands on fire the hands cause a big fire and that results to you putting your hands down. It will also hurt and could cause you have burnt hands

Conclusion:
In conclusion setting your hands on fire is dangerous but fun. you 


Thursday, August 3, 2017

Science

Dry Ice and Water
Aim: To watch dry ice and water mix together  to make coloured bubbles.

Equipment:
1. Dry Ice.
2. 80 Mls Water.
3. 3 drops food colouring.
4. Detergent.
5. Measuring beaker.
6. Icecream container.

Which gas is the heaviest?
Aim: To find out which gas is the heaviest  out of co2 and o2.

Equipment:
1.Test tubes
2.Test tubes rack
3.Dry ice
4.Water
5.Balloon

In conclusion Co2 is the heaviest gas out of o2 and co2.

Here are some photos on our experiments.

Dry Ice and Water.


Heaviest balloon.