Pages

Thursday, March 21, 2019

Distillation

This week for science we have been working about distillation, one of our experiments was distilling water from coke. It was a really fun experiment because at points it was distilling very quickly. Here is how we did our experiment.

Aim: To separate water from coke using distillation.

Equipment:Coke, conical flask, heatproof mat, a delivery tube and bung that fits the flask, bunsen burner, tripod, gauze mat, retort stand, boss head and clamp, boiling tube, Beaker

Method: 

1. Set up your equipment so then it looks like this Image result for distillation

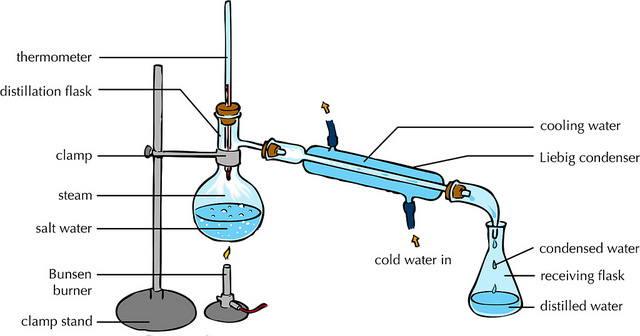
2. add about 50mL of coke to the conical flask and then put the bung and delivery tub on top of the conical flask.

3. Light your bunsen burner and put it under the tripod that holds the conical flask .

4. Heat the coke until it is at boiling point and carry on so then you can get the water out and into the boiling tube that is connected to the delivery tube that  goes into a beaker with ice inside of it. The ice will condensate the water vapor so then you have water.

5. Once most of the water is evaporated turn of the bunsen burner and look at your results.

Results:
Our experiment went very well and we collected quite a lot of water, it was fun watching the water condensate and then drop into the boiling tube. When the coke was at boiling point the water was boiling off quickly. The ice was condensating the water in the delivery tube which was cool to look at, it solidified very quickly and came in little drops. It separates the liquids by evaporating the water and making it go through the delivery tube. Distillation could be used in many ways in real life like turning saltwater into fresh drinking water, Gasoline is distilled from crude oil and so much more. During the experiment two different things are happening, Evaporation and Condensation. when the water is being boiled off it is evaporating into water vapor and going through the tube, condensation then happens after the water goes through the delivery tube which cools it down and turns it back into water.

Would you ever try to do this experiment?

Friday, March 15, 2019

Crystals

This week for our science experiment we created sugar crystals. It was really fun to make them, especially when we do get to eat them and see how well we made our mixtures.

Aim: To create sugar crystals


Equipment: Beaker, Sugar, Water, bunsen burner, food dye, cup, popsicle stick, measuring cylinder, something to stir with, tripod, heat mat, gauze mat, lighter.


Method:


1. Wash equipment


2. Add 50 mL of water into the beaker using the measuring cylinder.


3. Set up your bunsen burner and set it up. put the beaker on the tripod and on the bunsen burner. 


4. heat up the water to boiling point, then turn off the water so then you can add the sugar.


5 Gradually add sugar and stir it until it dissolves, then add more and repeat until you have a clearish liquid. 


6. grab a popsicle stick and dip it in water, then dip it into sugar so then as the crystal is growing it has something to stick too.


7. Grab a cup and put the popsicle inside of it, this is where the crystal will grow.


8. Add food colouring if you want and then pour in the liquid into the cup. Place it near a window to dry and grow.


9. wait a week or more then check how much your crystal has grown.


Results: The mixture looked really good even though we have only left it for a day, it is crystallising very well and it also looks very good. 

Conclusion: The mixture was very saturated, Saturated means when there is a lot of water in a mixture or item to the point that it can no longer absorb any more. We need our mixture to be saturated because when the water has started to evaporate the sugar will crystallize over time, we can't rush the mixture because it won't actually crystallize as well. The crystal grew very well and ended up looking cool as well.

Here is a photo of the mixture before and after.
BEFORE

 AFTER
What do you think I could've done better

Wednesday, March 6, 2019

Scones

Last week for Home Ec we made scones. The first thing we did was grab our dry ingredients and sifted them into a medium bowl, we then added butter and rubbed it until it became a breadcrumb consistency. We then added milk slowly into the bowl and mixed it with a knife then our hands. We mixed it till it started to clump up and took it out of the bowl after cutting it into quarters, we then rolled them up into three small balls and put them on our baking tray. We coated them thinly with milk and them put them in the oven for 15 minutes. The scones didn't taste very good because it couldn't cook properly because of the time.

Tuesday, March 5, 2019

Science

This week for science we did a experiment about dilution. Dilution is when a liquid has been made thinner by using water or a solvent. Here is how we did the experiment 

Equipment:
Potassium Permanganate crystal, Six large test tubes, tweezers, a plastic pipette, a test tube rack, 10mL measuring cylinder

Method:

1. Place six test tubes in the test tube rack. 

2. Using the measuring cylinder fill one test tube with 10mL of water, fill the rest up to 5mL of water. 

3.Using your tweezers put the single little piece of the crystal inside the 10mL test tube. 

4. Shake the test tube until the crystal dissolves and it is very concentrated. When something is very concentrated the mixture contains a lot of solute.

5. Using the pipette take out 5mL of water from test tube 1 and transfer it into the second one.

6. gently shake the second test tube and repeat the transfer process till all the test tubes are filled. 

I hope you try out this experiment because it is really cool, have you ever tried to do this experiment?

Friday, March 1, 2019

Textiles

This week for textiles we have been researching about paper, how to make it and how manufacturers make it. The paper process is very interesting and not good for the environment. We were asked to make a table on PMI( Positive, Minus, Interesting.) about how commercial paper is made. Here is my table about how paper is made


Positive
Minus / Negative
Interesting
They Recycle the water
Kills trees, which means that animals have no home and that they can’t live
They grow there own trees in a plantation and then cut them every year
Uses water more than once to clean logs.
Strips down the bark as it is not needed which means that there is no use, it’s waste.
3 Main stages - Pulping, Paper making, and Finishing
90% of water recycled.
They take out access water and thrown out because of the chemicals from the pulping.
Chipped up the wood into smaller pieces and put into chemical pulping. Breaks down liquid called lignin.
If you stop using paper it will slowly producing more waste for the world.
It’s killing forests and rainforests which are bad for the plants which means that there won’t be as much oxygen that there would be  
They roll the paper out into wide, long sheets that are about 80 inches wide and put it on a roll.

It creates a lot of waste
Saving paper still doesn’t help, it still needs to do the pulping process which is wasteful.

Uses about 10 MILLION GALLONS each day


It creates pollution


Social Studies

This week for Social Studies we have been working on family crests and our Identity. We were given a shield like crest that was split into four different areas that we were suppose to draw in.  My four squares were about my culture, my family, New Zealand and myself. In my culture square I did a bracelet to represent a holiday that my family celebrate. I did a Flame because of diwali, the festival of lights which I celebrate every year, and a christmas tree is obviously for christmas. In my family square I drew all my family members in the gender sign and did my parents shop which we own. In my New Zealand Square I did a Kiwi which is our endangered native animal, Mountains to represent Sir Edmund Hillary who climbed Mt Everest, The four stars to represent the flag, A Fantail which is a New Zealand bird, A koru, and a earthquake for the big christchurch earthquake. In my square about me I did my gender in the sign again a face structure for my drawing side, a game controller to show that I play games, my favourite band which is Panic! At The Disco, Me from my back, and a happy face to show that I am always happy.

Here is a photo of the crest, I hope you like it.